Sift provides a comprehensive fraud prevention solution that combines advanced machine learning techniques with real-time data analysis to help businesses detect and prevent fraudulent activities, protect their users, and maintain the integrity of their platforms.
Sift helps businesses to make accurate, real-time decisions that both improve user experience and increase revenue. You can use Sift whether you’re building a brand new risk system or looking to augment an existing legacy system.
See our Fraud Overview for more general information about how we support fraud prevention.
Sift-Specific Concepts
- Decisions: Decisions represent business actions taken on an order-level or user-level. You use decisions to record what has happened. Sift uses this information to continuously improve the accuracy of your risk scores. Sift allows users to add decisions and have a lot of flexibility.
- Workflow: In addition to Primer workflows, you will need to set up order and transaction level workflow in your Sift Dashboard. We take you through the required steps below.
What is supported?
Actions
- Pre-authorization -> We trigger a
create_orderevent on Sift. - Post-authorization -> We trigger a
create_transactionevent on Sift
Resulting decisions
Pass3DS(pre-authorization only)RejectFail
Payment methods
- Card
Instructions
Set-up Instructions
- Go to your Primer Dashboard.
- Navigate to the "Integrations" section, select "Add Integration" at the top of the page and search for Sift. Follow the dashboard instructions.
- For sandbox testing make sure you have enabled sandbox mode. Click on the account icon and toggle "Sandbox".
- Follow the rest of the steps to set up Primer Workflows for fraud checks.
Set up a Sift workflow
Set up decisions
For the integration to work with Primer use the specified decision format:

- Go to Automate > Decisions
- Create or edit your Sift decisions so that they have the following names:
order_looks_badwith Category “Block”3DSwith Category “Watch”order_looks_okwith Category “Accept”
- Note: When renaming a Category, you may need to remove it from any Sift workflow that uses it, save that workflow, and then re-assign it to the workflow.
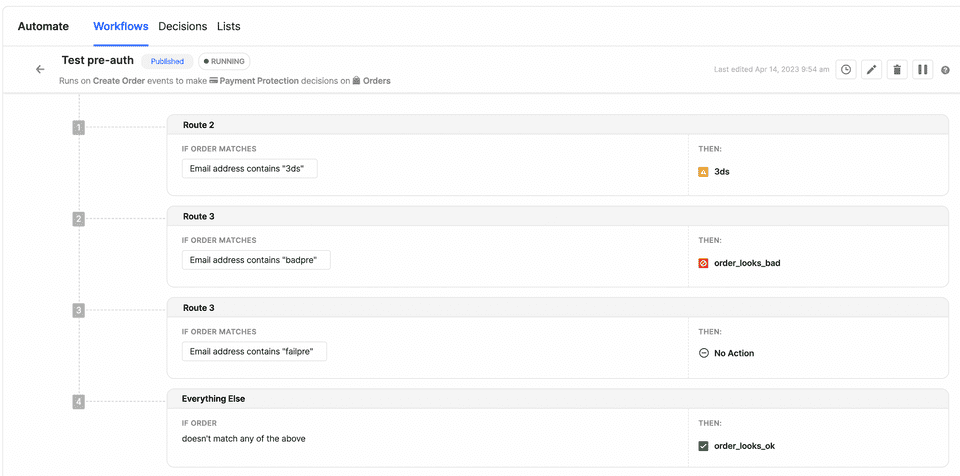
Set up pre-authorization workflow
- Go to Automate > Workflows
- Set up a pre-authorization (create order) Sift workflow
- Add new Workflow
- Set Type of Workflow to: “Payment protection”
- Set Triggered on which Events to “Create order”
- Set your Sift workflow routes to use some or all of the three Sift decisions defined above
- Set to Always Run

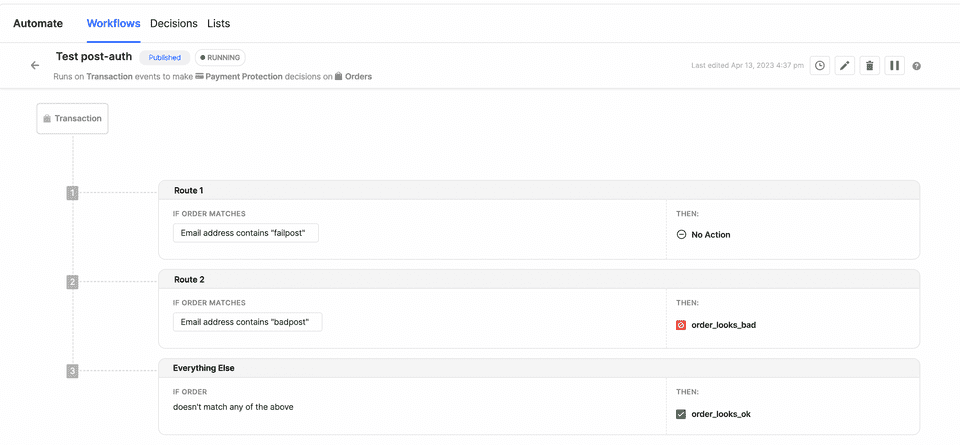
Set up post-authorization workflow
- Go to Automate > Workflows
- Set-up a post-authorization Sift workflow
- Add new Workflow
- Set Type of Workflow to: “Payment protection”
- Set Triggered on which Events to “Transaction”
- Set your Sift workflow routes to use the
order_looks_okandorder_looks_badSift decisions - Set to Always Run

Required fields
For card payments, the following fields have to be passed for Sift to accept the request.
| Field | Type |
|---|---|
customer.emailAddress | string |
Testing
Pre-authorization fraud check
- To trigger a
Passoutcome, setcustomer.emailAddressto start without_of_scope. - To trigger a
Rejectoutcome, setcustomer.emailAddressto start withfraud. - To trigger a
3DSoutcome, setcustomer.emailAddressto start withsca. - To trigger a
Failoutcome you will need to pass a request that is incorrect. An example of this is to set thecurrencytosomethingas this field needs to be a recognised currency code.
Post-authorization fraud check
- To trigger a
Passoutcome, setcustomer.emailAddressto equaltest@approve.com - To trigger a
Rejectoutcome, setcustomer.emailAddressto equaltest@decline.com